Category: WORDPRESS

Web development, programmer engineering website

How To Create A WordPress Membership Site

Have you ever wondered how people create a WordPress membership site and make money from it? You’re in luck! Because today we’ll show you the steps to build a membership website .

A large number of companies are rushing to join the digital membership economy. The two most popular models are online communities and subscriptions. In fact, 76% of businesses claim that a subscription-based model helps create customer retention and long-term relationships with customers.

Now you can subscribe to your favorite meal kit, fashion brand, groceries, toiletries, even dog toys. Or you can join the premium community for guidance and useful suggestions. Also, it gives you the chance to build connections with like-minded people on topics ranging from entrepreneurship to travel destinations. This means the membership model is getting popular for both sellers and buyers.

Since there are many benefits to creating a membership website. But before introducing any membership model in your business you need to consider the niche type and consumer preference. Let’s explore the things below-

6 Popular Types of Membership Sites

A membership website is a site that offers limited and exclusive content to members. You can charge your audience a monthly or annual subscription fee in exchange for access to gated content, community, services, or benefits.

If you are an expert in a particular field, you may share your knowledge and make money from your membership website. All you need to do is- encourage people to log in to your site and buy a membership to view or download premium content.

Netflix is the most common classic example of a membership website. Here users pay a recurring fee to get access to the content. There are several types of membership models. Such as paid online courses, industrial community, premium support forums, newsletters, and webinars.

If you want to create a WordPress membership site here are a few categories you can choose from-

  1. Business Development Membership Sites
  2. Career Coaching Membership Sites
  3. Hobby Membership Sites
  4. Online Course Membership Sites
  5. Product/Service Bundle Membership Sites
  6. Community Membership Sites

1. Business Development Membership Sites

You are a successful businessman who inspires people to entrepreneurship. Now you can share your experience with the audience having the same interest. Tell them how to build a business from scratch, common obstacles, and possible solutions.

On BizChix.com, Natalie Eckdahl helps entrepreneurial women build, grow, and scale their businesses. Premium membership gives them access to weekly and bi-weekly group coaching, pre-recorded content, a community of women entrepreneurs, and more.

2. Career Coaching Membership Sites

If you hold a good position in your career, tell people about your journey throughout the years. Position yourself as an authority in your field. Also, you may offer helpful resources, industry-based courses, expert tips, and other elements to your premium members.

Personal growth author Jennifer Louden encourages her fellow members to become great writers. On The Writer’s Oasis, she discusses your fears, overcoming your creative blocks, and how to spread your voice.

3. Hobby Membership Sites

Even an interesting hobby can be the niche for your membership website. Suppose you are passionate about something and practice it for years. You can share your knowledge with others who have also an interest in it.

Marie Greene learned to knit from her grandma. Now she becomes an inspiration for knitters worldwide. Premium members of Olive Knits get to learn twelve new patterns per year. It includes complete tutorials, live webinars, tips and tricks, and access to the Knit Camp online community.

4. Online Course Membership Sites

This is the most popular type of membership site model. Here members pay a fixed amount or monthly subscription fee in order to get access to your online course. Online courses usually come with different formats of content such as video tutorials, audio lectures, useful documents, quizzes, and downloadable resources. You can merge a forum or discussion board into your course site as well.

The popular online learning platform Udemy offers thousands of courses in different categories. Students get access to premium courses by paying a subscription fee.

5. Product/Service Bundle Membership Sites

You can use your membership website to sell digital or downloadable products. Such as videos, plugins, themes, and downloadable resources like industry reports. This model is equally applicable for physical products. Suppose you build a membership community for marathon runners. And send running instruments to your subscribers every month. You may perhaps share upcoming marathon news and healthy tips on your site too.

If you are a service provider, running a service-based membership site can help grow your business. This is mostly used by entrepreneurs who provide one-on-one services to customers.

6. Community Membership Sites

A membership site allows you to build an interactive online community. You can bring a large number of people together belonging to the same profession, country, or group under a roof. So, they can help each other by sharing educational resources, professional tips, or personal stories. It is also possible to include an online community to any other type of membership website we’ve mentioned above. Because it’s one of the best ways to connect members and build engagement.


Step 1: Select Your Domain, Hosting, & Suitable Platform

Once you decide your niche, now it’s time to choose the perfect domain for your membership website. When brainstorming for domain names consider the things below:

  • Easy to say & spell
  • Name that correlates your brand
  • Go with .com, .org, or .net.
  • Avoid numbers and hyphens
  • Search engine friendly

If you want to change your existing domain address, check out our article on “How to Change WordPress Domain Address“.

After finalizing the domain name, you need a good web host to live your website. There are many prominent web hosting providers. Check the Top 10+ WordPress Hosting Providers and pick the right one for you by checking their features, pricing, and stability.

Now, it’s time to configure your subscription-based website for users. Fortunately, you don’t need to know a bunch of codes or hire any pricey developer since you have WordPress. First set up your WordPress site and then install & activate WP User Frontend in your site.

With WPUF you can arrange your subscription packages in several categories. It comes with subscription features, like pay per post, content restriction, and guest postingYou have the flexibility to choose and create combinations of these features.

Follow this step-by-step guide to Create A Subscription Based Membership Site Using WordPress.

Step 2: Plan Contents Both for Traffic Generation & Special Ones for Monetization

You get your site ready to up. Now select what type of content you want to include in your website. First craft your buyer persona. So, you can create content matching their needs, style, and taste.

Inside your membership site, you can categorize the content based on subscription level. This means to unlock some exclusive content your readers need to enroll in the next-level subscription. It always makes your premium users feel special and increases the value of your content.

Planning for content is a lengthy and continuous process. We divide the content marketing plan into 2 parts:

1st part: Pre-consideration Before Launching Your Website

  • Set Your Content Goal that Conveys Your Business Purpose
  • Study Your Audience to Know Their Urgency
  • Research Your Top-Matched Keyword that Aligns with Your Niche
  • Keep an Eye on Your Competitors to Track What’s They’re up to
  • Make a Content Publishing Calendar to Keep Consistency
  • Set Content Promotional Plans to Outreach Your Audience

2nd part: Continuos Process to Publish Content Regularly on Your Website

  • Create Top-Notch Contents that will be Referred as Resource
  • Publish trendy content that bring some extra traffic to your site
  • Create special content on big days and occassions
  • Conduct a Content Audit on Your Site to Know the Current Position
  • Measure Your Content Performance to Find out Where to Improve

If you want to learn more about this, check out this article on How to Create a Content Marketing Plan.

Also, make the content informative that add value to your readers’ lives. Suppose you run a website sharing weight loss tips. You can include some generic content on healthy habits, the weight loss process, proper nutrition tips, etc. For your premium members offer some specific diet chart based on their calorie level, age, and weight. You can also include famous dieticians in your program to guide your members with useful tips and tricks.

Step 3: Determine Your Subscription Plans and Pricing

Premium subscriptions allow you to make a recurring revenue from your users. Your content must provide enough value that inspires people to pay for a subscription to access it. If you understand your readers’ needs and produce unique content according to them, you can do a lot with your website.

There are several types of subscription options you may offer to your users. Such as:

  • Trial period subscriptions: Set a time period for a free subscription. So users can decide if they like your site content before paying.
  • Paid subscriptions: Users must pay a fee to enroll in the subscription. Charging process can be a one-time fee, a monthly fee, or a yearly membership fee.
  • Free subscriptions: Users will get content and other offers of your site in exchange their name and contact information.
  • Automatic renewal subscriptions: The subscription will be renewed automatically after a certain time period and charge the users.
  • Manual renewal subscriptions: A user needs to renew the subscription if s/he wants to continue using the benefits associated with the membership.

It is best to arrange your subscription packages that work with your business offerings and users. Analyze your competitors and check what they’re offering to their members at which price. Considering these facts set your subscription levels and their prices.

Attractive names of subscription tiers may boost your audiences’ curiosity to join your community. Learn How to Name Your Membership Levels in line with your brand.

Step 4: Restrict Access to Your Exclusive Content

Content restriction gives you the chance to keep your exclusive content restricted/invisible to non-subscribers. Only the premium members have access to those parts of your content. This feature makes your membership exclusive for the users.

WP User Frontend makes you able to apply different levels of restriction to your membership website. Such as:

  • Partial Content Restriction
  • User Role Based Restriction
  • Subscription Based Restriction
  • Restriction for Visitors
  • Menu Restriction
  • Taxonomy Restriction

Rather than locking up all your content, you can set some of your resources free access. So, users can get an idea about your content quality and its usefulness. Or you can let your readers see a part f your content. In Scholarly or IEEE, you can only read a part of that article or the introduction part which will give you a brief idea of the research. Now, if you find it beneficial, you must subscribe to their website to read the full article. This is called partial content restriction.

Read More: How To Set Up Partial Content Restriction In WordPress.

Engage people first with free content so they feel interested in your brand. Once they hook up, start charging them for your exclusive content through subscription. It would be crucial to decide which type of content you want to restrict for your premium users. Based on that, you have to build your content plan indeed.

Step 5: Include Reliable Payment Methods

The main objective of your membership website is to make money from subscriptions. Since it’s extremely important to keep all the transactions secure and smooth. People will share their confidential information during buying membership, you are likely to keep your site super protective. Providing all the payment gateways that your target audience usually prefers, is also required to ensure a great user experience.

With WP User Frontend your subscribers can easily pay through PayPal or direct bank. You don’t need to add any extension to enable this feature. Moreover, you can include Stripe as the Payment Gateway for your users.

Step 6: Optimize Your WordPress Membership Website

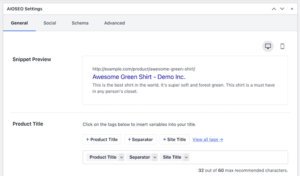
Needless to say that, a great website can also fall if it doesn’t visible on the search engine. In order to get a significant response from your users, your site must have a higher position on SERP. You may already know about common SEO practices you should apply to ensure the best results. Give a quick look at this SEO Checklist For A New WordPress Website.

Here we focus on the areas you should especially take care of for your membership website:

Create high-quality content: Useful content gives visitors a reason to keep coming back. Also, if your site has fresh and engaging content, people stay longer on your site. These matrics send a positive signal to Google bot and you can secure a higher position on search engines.

Include Visual Content: Visual content affects your brain faster than plain text. People also feel more interactive with visual information. Such as images, videos, gifs, quote, screenshots, etc.

Optimize Your Membership Site for Mobile: Over 60% of Google searches come from mobile devices. There is a high chance most of your users will use mobile or tabs to visit your site. So, make your website fit for all screen sizes.

Improve Your Page Loading Speed: You need to handle premium members who will pay for gated content. Your site speed must be optimized so they can get quick access to their preferred pages. Happy clients help websites get a higher ranking on SERP.

Join Question-and-Answer Sites: Regularly answer related questions from popular Q&A sites like Quora. Firstly, figure out the questions from your niche and then answer them elaborately. Don’t forget to link your site that seems to appear naturally. By doing this, you’re helping people and getting attention to your links. This way you’ll get many authentic members for your website.

You can also earn from your WordPress blogging sites by letting your users create their own content. Learn how to Make Money With Guest Posts From Your WordPress Site.

Read More
Web Solutions January 4, 2022 0 Comments

The Best Ways To Start An E-Commerce Company

Entrepreneurship is the act of starting your own business, whether it be a brick-and-mortar store or an online store. It can be both exciting and scary to start something on your own. The idea of entrepreneurship is exciting because you are your own boss, but the fear of uncertainty about the future can be overwhelming.

The truth is, there are many ways to start an e-commerce company. The best way for you to find out which one might work best for you is to explore all avenues, explore what each one entails, and then make a decision based on what you’ve learned. For some people, this could mean spending hours at night researching different platforms and business models while for others exploring their passions in life.

When starting an e-commerce company, there are many things to consider. You need to find a niche and make sure that your products stand out from the competition. You also need to figure out where to host your website and how to get customers.

Read on for everything you need to know about starting an e-commerce business. From choosing a domain name and acquiring a hosting plan, designing and developing your website and mobile apps to marketing it online, this article covers everything you need to know.


The Pros and Cons of Starting an E-Commerce Company

Creating your own e-commerce company is a great idea, and many people have used it to great success. However, there are some challenges that come along with running an e-commerce business. There is no silver bullet to help you get everything right, so it is important to do your research and ask for advice from others. It is important to consider everything.

Your success in the e-commerce business will also depend on whether you want to do it full-time or part-time. The full-time e-commerce business is a lot more difficult, as you need to develop new products every day. There are many more marketing elements involved in running a full-time business.

The Ways to Start an E-Commerce Website

Online e-commerce software companies offer a variety of features that you can use for your website and store. Many of these are free and offer easy ways to test products and themes before making a purchase. While testing products or themes you’ve already made a decision to purchase, you can use these free services to place orders.

Free E-Commerce Software

Mozilla Firefox is a free web browser that many small businesses use for their websites. You can use the version that is compatible with shopping carts to create an e-commerce site for your business. Some features you can use to test the shopping cart function on your website include Pay-Per-Click, CTA buttons, and feed filters.

Many websites like Shopify offer services that allow you to build your own website.

The Basic Things  of Starting an E-Commerce Company

Once you decide on the best e-commerce platform or business model, you’ll also need to determine how much capital you’ll need to get started and where you’ll get it. You’ll need to set aside money to buy your domain name, purchase your website design, and pay for all the things that will go into the day-to-day operations of your business.

Some of these expenses can be fairly expensive, and for those who have never started an e-commerce business before, it can be hard to know where to start.

If you have some experience running a website, you can set up your own domain name at a cost of around $20 to $40 per year. Websites that run on WordPress can be set up for $5 per month, and other platforms can run you anywhere from $25 per month to $600 for a full website.

Choosing Your Niche

Each person has a unique opportunity to do something different. Some people prefer to be creative and like to start companies based on their talents or hobbies. However, for most people, entrepreneurship has its pros and cons.

The big advantage of being an entrepreneur is being able to control your own destiny, but that comes with a lot of hard work. To build a successful business, you will need to put in an incredible amount of time and effort, but it can also lead to a fulfilling life experience. You also get to make the decisions that determine your success and how successful you’ll be.

Finding your niche is one of the most important steps for any business, but it isn’t easy. In fact, it may be one of the most important aspects that an entrepreneur will have to focus on.

Choosing a Platform for Your E-Commerce Company

Once you have determined what kind of business you’d like to create, it’s time to explore the different platforms that can help you with your idea. Because e-commerce websites are so diverse, it’s important to choose a platform that is designed specifically for your product or service. This helps you to stand out from the crowd and create something that customers will actually want to buy.


Pricing Your Products

Pricing is a major issue for a lot of e-commerce businesses. There are so many different components to price a product:


  • Features of your product: price, shipping cost, payment processing, returns policy, discounts, etc.


  • Category: the different price points in the category your product falls in.


  • Weight: Weight Vs. Price: Physical or digital media, and whether to print or use an app.


  • And then there are extra services you might offer, such as software or a customer support package. Each of these can influence your pricing.

Consider your customer’s buying habits and where they are in their shopping journeys. You will have to make the decision on a price point that is fair and realistic for your market.

Do your market research to know the best pricing.


Tools Helping Your Business

Saving some extra money can never be bad. If you search online, you will get a number of tools that will help you to automate your business process for which you might have planned to invest money otherwise. 

Read More
Web Solutions January 4, 2022 0 Comments
Miniature web developer maintaining the website or analyst analysis data. Isometric design for teamwork or Web Developing concept.

Tips of Making WordPress WooCommerce Store Awesome

Your own online store doesn’t have to be just a dream. Thanks to WordPress now anyone can make an online store with WooCommerce. It’s quick, easy and you can set up a professional-looking website to sell your products without spending a lot of money.

The  WooCommerce Menu/Navigation Store

A flat website architecture shortens the number of clicks a customer will need to perform to reach their desired destination, and it’s a pretty popular model. Just visit popular online stores such as Amazon or eBay to see what we mean – they clearly display links to their most popular pages plus any new or highly relevant content (like sales, or limited edition products).

Products must be Discoverable by Categories and Subcategories

Why do you need category pages? The first big reason is for SEO. The more specific pages you have with long-tail keywords the more likely it is that new customers will discover you in search engines like Google or Bing. So while having a “Monitor” category is great, adding subcategories for “Monitor Brands” and “Display Size & Resolution” gives you even better odds of ranking.

Real-Time Search in WooCommerce

In an effort to make it easy for your customers to find exactly what they want we also recommend using Real-Time or Live Search. With it, prospects will be able to view out the most popular and relevant search results of your eCommerce site in real-time speeding up the online shopping process.

Speed Up Your WooCommerce Store

Surely, you did a great work to set up your eCommerce site. Still, you need it to work as fast as possible for a lot of reasons. Firstly, it makes your SEO better. Search engines like Google take page load times into consideration. It’s more likely for a page that loads in a second or two to rank higher than a page that takes thirty. Secondly, today even a 5-seconds delay will make your customers want to leave and it’s a top contributor to an increased bounce rate.

Add Helpful Features with Plugins

First, choose a theme that looks similar to how you want your store to. Preferably a theme with built-in styling options. Next, check out this list of the best WooCommerce extensions and add-ons to add a few more features you might want or need to your store. Chances are there’s a plugin for the features you want. Add memberships, discounts, referrals, infinite scrolling and more. Just don’t go crazy and install too many plugins – often times you can find one plugin with multiple features you want, and the fewer plugins you have the fewer chances there are for a conflict.

Read More
Web Solutions January 4, 2022 0 Comments

16 WordPress Typography Plugins Which Are Helpful To Improve Design Knowledge

Why is Typography Important for Your WordPress Site?

Your website typography is a very important part of your overall design. Choosing beautiful and easy to read fonts will increase your website engagement and boost the time your users spend on your site.

Many of the best WordPress themes come with access to Google Fonts and allow you to tweak the typography to suit your needs.

There’s also built in settings within the post and page editor that give you more control over your fonts and layouts.

However, there’s a lot more you can do with your typography, like add subtitles, use drop caps, include footnotes, let users resize fonts, and much more.

By choosing the right WordPress plugins, you can improve the typography on your WordPress website without writing any code.

Having said that, let’s take a look at some of the best WordPress typography plugins that you can try on your website.


1. Easy Google Fonts

Easy Google Fonts

Easy Google Fonts lets you use the library of 1,300+ Google Fonts on your WordPress site. It’s compatible with any WordPress theme and adds a ‘Typography’ tab to your WordPress theme customizer.

Using the typography tab, you can change fonts while viewing a live preview of your changes in real time. You can select font sizes, change colors, add padding, and much more.

For more details, see our guide on how to add custom fonts in WordPress.


2. wp-Typography

wp-Typography

The wp-Typography plugin gives you more control over special characters like hyphens, ellipses, trademark symbols, fractions, and more.

It supports 50 different languages and can help to provide an improved reading experience for your visitors.

3. Advanced Editor Tools

Advanced Editor Tools

Advanced Editor Tools (previously TinyMCE Advanced) gives you more control over font sizes and text formatting.

It adds a new block called ‘Classic Paragraph’ that gives you the option to change fonts, colors, add tables, lists, and more.

For those using the WordPress classic editor, this plugin adds more advanced editing features to the post and page editor.

For more details, see our guide on how to easily change the font size in WordPress.

4. Zeno Font Resizer

Zeno Font Resizer

Zeno Font Resizer gives your visitors the option to change the font size on your website with a couple of clicks. This can improve your user experience for those who prefer larger text.

The plugin makes it easy to add a font resize option to your WordPress sidebar. It also uses jQuery, so your visitors can adjust the font without the page reloading.

5. Page Title Splitter

Page Title Splitter

Page Title Splitter is a unique plugin that lets you split longer post titles into two lines. This lets you use longer and more descriptive post titles while making sure they’re still readable.

This works for all posts, pages, and custom post type titles. It gives you complete control over the layout of your title on desktop and mobile devices.

6. Secondary Title

Secondary Title

Secondary Title is a simple plugin that lets you add subtitles to your posts and pages. This is common with popular websites like Buzzfeed, Medium, Mashable, and more.

Adding secondary titles, or subtitles, lets you explain your title and gives you a better chance to hook your readers and encourage them to read your content.

For more details, see our guide on how to add subtitle for posts and pages in WordPress.

7. footnotes

footnotes

The footnotes plugin lets you easily display footnotes on your WordPress posts and pages to help make your site more trustworthy.

Footnotes let you add references to your content and are the perfect way to add comments, show important facts, tips, and more.

For more details, see our guide on how to add simple and elegant footnotes in your WordPress posts.

8. Initial Letter

Initial Letter

Initial Letter lets you easily add drop caps to your WordPress blog posts and pages.

This is a styling technique commonly used in magazines and print books. By starting the first letter with a large font size, you can capture reader attention.

For more details, see our guide on how to add drop caps in WordPress posts.

9. Text Hover

Text Hover

Text Hover is a plugin that lets you add a text hover box to your content and make your site more interactive.

This can be helpful when displaying phrases, definitions, explanations, acronyms, and more. It helps to give your readers more context when reading your articles.

10. Custom Adobe Fonts

Custom Adobe Fonts

Custom Adobe Fonts lets you add popular Adobe (formerly Typekit) fonts to your website.

The plugin works with most popular page builders, so you have a larger font library to choose from when customizing your site.

11. Font Awesome

Font Awesome

Font Awesome lets you add icon fonts to your website. Icon fonts are simple pictograms you can use to improve your buttons, feature boxes, navigation menus, and more.

For more details, see our guide on how to easily add icon fonts in your WordPress theme.

12. Use Any Font

Use Any Font

Use Any Font lets you upload custom fonts to WordPress. This is great if you have custom fonts downloaded to your computer that you want to use.

You can also use fonts from the font library that has over 20,000 different fonts to choose from.

13. Styleguide

Styleguide

Styleguide lets you customize your theme’s fonts and colors in your theme customizer.

This lets you change the appearance of your fonts without having to add custom CSS to your website. It’s compatible with most WordPress themes.

14. OMGF

OMGF

OMGF is a plugin that will optimize your Google Fonts. It lets you host your fonts locally to speed up loading times.

The plugin helps to minimize DNS requests, reduces layout shifts, and leverages browser caching to improve performance. It’s very beginner friendly and runs quietly in the background.

15. SeedProd

SeedProd

SeedProd is the best WordPress page builder in the market used by over 1 million sites. With this plugin, you can create custom pages and have complete control over the appearance of your fonts.

You can even use the dynamic text feature to create animated headlines to attract your visitors. Plus, you get access to the entire Google Fonts library to use on your website.

16. WP Rocket

WP Rocket

WP Rocket is the best WordPress caching plugin in the market. It’s very beginner friendly and helps you speed up WordPress.

There’s a unique caching option that will optimize your Google Fonts with a single click. If you run a website speed test, then this is one of the most common speed issues users report.

For more details, see our guide on how to install and setup WP Rocket in WordPress.

We hope this article helped you find the best WordPress typography plugins for your website. You may also want to see our expert picks of the best virtual business phone number apps and our guide on how to get a free email domain.

Read More
Web Solutions December 29, 2021 0 Comments

How To Make Custom Searchable WordPress Fields

What Are Custom Fields & Why Make Them Searchable?

WordPress custom fields allow you to store any kind of additional information (metadata) about a post or page.

WordPress adds metadata such as title, author, date, time, and more to your posts and pages. With custom fields, you can add more information about your content, and display them on your website if you wish. A lot of popular WordPress plugins and themes use custom fields to store important data.

For example, the content you enter in your WordPress SEO plugins such as All in One SEO is technically a custom field, or custom product attributes that you may add to your WooCommerce products sometimes are also custom fields.


However, WordPress doesn’t search content on your website using custom fields. By default, when a visitor uses a search bar on your website, WordPress will only show them results where the title and content match their search terms.

Making your custom fields searchable improves the user experience on your WordPress website. It allows your visitors to search for any content with ease, keeping them on your website longer and reducing any frustration.

That said, let’s look at how you can make custom fields searchable.


Making Custom Field Searchable in WordPresss

The easiest way to make custom fields searchable is by using the SearchWP plugin. It’s the best WordPress search plugin and allows you to adjust the search algorithm without editing code.

The plugin indexes everything on your WordPress site. For instance, it uses custom fields, PDF documents, text, custom tables, files, categories, shortcodes, and more to improve WordPress search for your users.

Besides that, SearchWP works seamlessly with other popular plugins like Advanced Custom Fields, Meta Box, Toolset, Easy Digital Downloads, WooCommerce, and Pods.

To start indexing your custom fields, first you’ll need to install and activate the SearchWP plugin. If you need help, then please see our guide on how to install a WordPress plugin.

Upon activation, you can head over to Settings » SearchWP and then navigate to the ‘Engines’ tab from the WordPress admin panel.

After that, you’ll need to click the ‘Add/Remove Attributes’ button to add custom fields to the search algorithm for your posts, pages, and media.


When you click the button, a popup window will now appear.

Go ahead and click the dropdown menu under Custom Fields and then select the ‘Any Meta Key’ option to make all your custom fields searchable. Or you can type the custom fields you want to include during the search process. if you don’t want to include them all.


Once you’ve chosen the custom fields, simply click the ‘Done’ button.

A custom fields option will now be added to the search algorithm for posts. You can see the ‘Custom Fields’ under the Applicable Attribute Relevance section.

Next, you can adjust the attribute slider to set the relevance weight given to each attribute during a search.


For example, if you move the slider to the right and set it to maximum, then SearchWP will give high preference to the data in the custom fields when searching content on your site.

You can now repeat the step for making custom fields searchable for pages and media files.

After making these changes, don’t forget to click the ‘Save Engines’ button.


SearchWP will now index your content, PDF metadata, custom fields metadata, images, files, and other types of metadata to include in WordPress search.

You’ll be able to see the ‘Index Status’ in the right corner and view how many items the plugin has indexed.


Besides that, SearchWP also offers other customization settings.

For instance, if you go to the ‘Settings’ tab, then you can add stopwords and synonyms to be ignored during the search process to improve relevancy and performance.

The plugin will already have a list by default, but you can add more stopwords if you want. Similarly, you can add synonyms for search terms that you want to ignore while searching.


Next, you can edit more settings by going to the ‘Advanced’ tab.

For example, the plugin lets you enable the option to show partial matches when search terms show no result, limit results to exact matches when double quotes are used, remove minimum word length, and more.


Now, if you want to see the search history and see which queries your users search the most, then head over to the ‘Statistics’ tab.

The plugin will give all the stats about your WordPress search from the past 30 days or the last 1 year. You can use this data to see which queries your users search while on your site and come up with new content ideas.


We hope this article helped you learn how to make custom fields searchable in WordPress. You may also want to look at our guide on how to register a domain name and the best WordPress plugins for business sites.

Read More
Web Solutions December 29, 2021 0 Comments

How To Properly Add Background Images To Your WordPress Site

Adding a background image to your WordPress site is easy. Right?

For the most part, yes. Unless your theme doesn’t support it. Truth is, many WordPress themes today have quick and easy settings for adding or changing an existing background image. As do the default WP appearance customizations.

You can also change the background using CSS or through various plugins, opening up options for setting a background image on pages, posts, and categories.

In this article we’ll show you how to do all the above, and make your site stand out with an eye-catching look of your own choosing.

Why change your background? Well, the image your theme defaults to might not appeal to you, or feel like it jives with your branding. Or, maybe it’s not an image at all, just colors. Or perhaps you loved the image originally, but you’ve gotten bored with it.


Add a Background Image Using The Default WordPress Customizations

WordPress themes can have a colored background or default photo in the background. Most people choose to replace these with an image and/or colors that better suit their taste and site branding.


To add a background image in the default WordPress editor, you’ll need to follow these steps:

  • From the WP dashboard, go to Appearance > Customize > Background Image or Appearance > Background/Background Image.
  • Click on the Select Image button to open your Media Library.
  • Choose desired image, either by uploading from your computer or by selecting one from your media library.
  • Once you have the image you want selected, click on the blue Choose image button.
  • In the top window of the left-side menu, you’ll see your selection populate. To the right, you’ll see a full-size preview of your sites’ home page, with the background image.

If you like what you see, click the blue Publish button in the upper right hand corner, and you’re done!

If you want to change the way it looks before finalizing, there are a number of settings and options you can play with to find your preferred look.


The background image menu editing tools, along with their associated options, are as follows:

  • Preset
    • Default, Fill Screen, Fit to Screen, Repeat, Custom
  • Image Position
    • Center, Top Right, Middle Right, Bottom RIght, Middle Bottom, Top Left, Middle Left, Bottom Left, Middle Top
  • Image Size
    • Original, Fit to Screen, Fill Screen
  • Repeat Background Image – checkbox
  • Scroll with Page – checkbox

Play around with the editing tools to see what size, pattern, and position you like best. Selecting any of the dropdown options from the submenus will give you the resultant preview of your page on the right.

Don’t worry about being stuck with anything. It’s easy to go back in settings and change the background image (and related options) anytime you like.


Add a Background Image Using a Plugin

  fine-tuned control over what images are used, and where.

So go ahead, and get creative with your backgrounds. Make a thematic impact, and keep your visitors visually engaged.


Simple Full Screen Background Image provides easy install and setup of a full screen image as the background of your website. It scales images automatically with the browser, which means the image always fills the screen.

Putting it into action requires only a few simple steps. There is a paid/pro version available that adds other features, but the free version is all we need for this exercise.

Let’s use the plugin now to add a full screen background image.

  1. Install & activate the Simple Full Screen Background Image plugin.
  2. From the WP dashboard, go to Appearance > Fullscreen Background Image.
  3. Choose desired image, either by uploading from your computer or by selecting one from your media library.
  4. Once you have the image you want selected, click on the blue Use Image button.
  5. Click on the blue Save Options button, and check out your site.


There you have it! The image should now be showing on your site as a full screen background image.

I wanted to mention this plugin’s settings for background image overrides the default WP customize background settings. This isn’t a bad thing, just something to note.

Setting a background image for single posts, pages, categories, tags, and more with this particular plugin is possible, but will require purchasing the pro version.


Add a Background Image Using CSS

Now we’re going to explore how to change the background image using CSS code. This can be done to make a background that is site-wide or for a specific category―using the WP theme customizer.


  1. From your WordPress dashboard, navigate to Appearance > Customize.
  2. Scroll down and click on Additional CSS.
  3. Paste the appropriate code in the CSS field as follows.


Back(ground) to Basics

Adding backgrounds to your WordPress site may seem like a small thing. But if done properly, it can make a big impact. It can also help keep your online presence fresh, so visitors don’t get bored always seeing the same pictures over and over again.

It’s ideal to use the built in customization of a theme’s functionality for adding background images when it exists, as it’s specifically designed to work as coded.

However, you do have other options when it comes to putting WordPress background images in place. WP core customization, plugins, page builders, and CSS tweaks, all make it possible to get fine-tuned control over what images are used, and where.

So go ahead, and get creative with your backgrounds. Make a thematic impact, and keep your visitors visually engaged.

Read More
Web Solutions December 29, 2021 0 Comments